Why Excel onboarding breaks down at scale
A shared onboarding spreadsheet works fine for three hires. By the time you're running ten or twenty concurrent onboardings across multiple departments, the model falls apart in predictable ways.
First, there are no notifications. When an owner completes a task or a step is ready for the next person, nothing happens automatically — someone has to either check the sheet or send a Slack message. That manual handoff is where things fall through the cracks. Second, visibility is always a snapshot — any status report leadership receives is only as accurate as the last time someone manually updated their cells, which could have been three days ago. Third, there's no accountability trail — Excel doesn't log who changed what and when, which matters when onboarding touches payroll, system access, and compliance tasks.
The underlying issue is structural: Excel is a calculation tool being used as a workflow tool. It has no concept of triggers, owners, or notifications. Smartsheet does.
The four-part architecture: Forms, Automation, Reports, and Dashboards
Before jumping into setup, here's how the four components connect:
- Form — HR or the hiring manager submits one form per new hire. The form drops a new row into the master sheet and triggers the entire onboarding chain. No one touches the sheet directly.
- Automation rules — Smartsheet watches the sheet and fires triggers: assign an owner when a row is created, notify them when their task is due, escalate if something is overdue. This is the piece Excel fundamentally cannot do.
- Report — A filtered, live view of open and overdue tasks shared with the HR or operations team. They see what needs action without accessing the full sheet.
- Dashboard — A summary view for leadership: total active onboardees, completion rates, overdue items. It refreshes automatically. No one compiles a status report by hand.
The master sheet remains your single source of truth. Everything else reads from it — nothing writes to it except the Form and direct task updates from assigned owners.
How to set it up, step by step
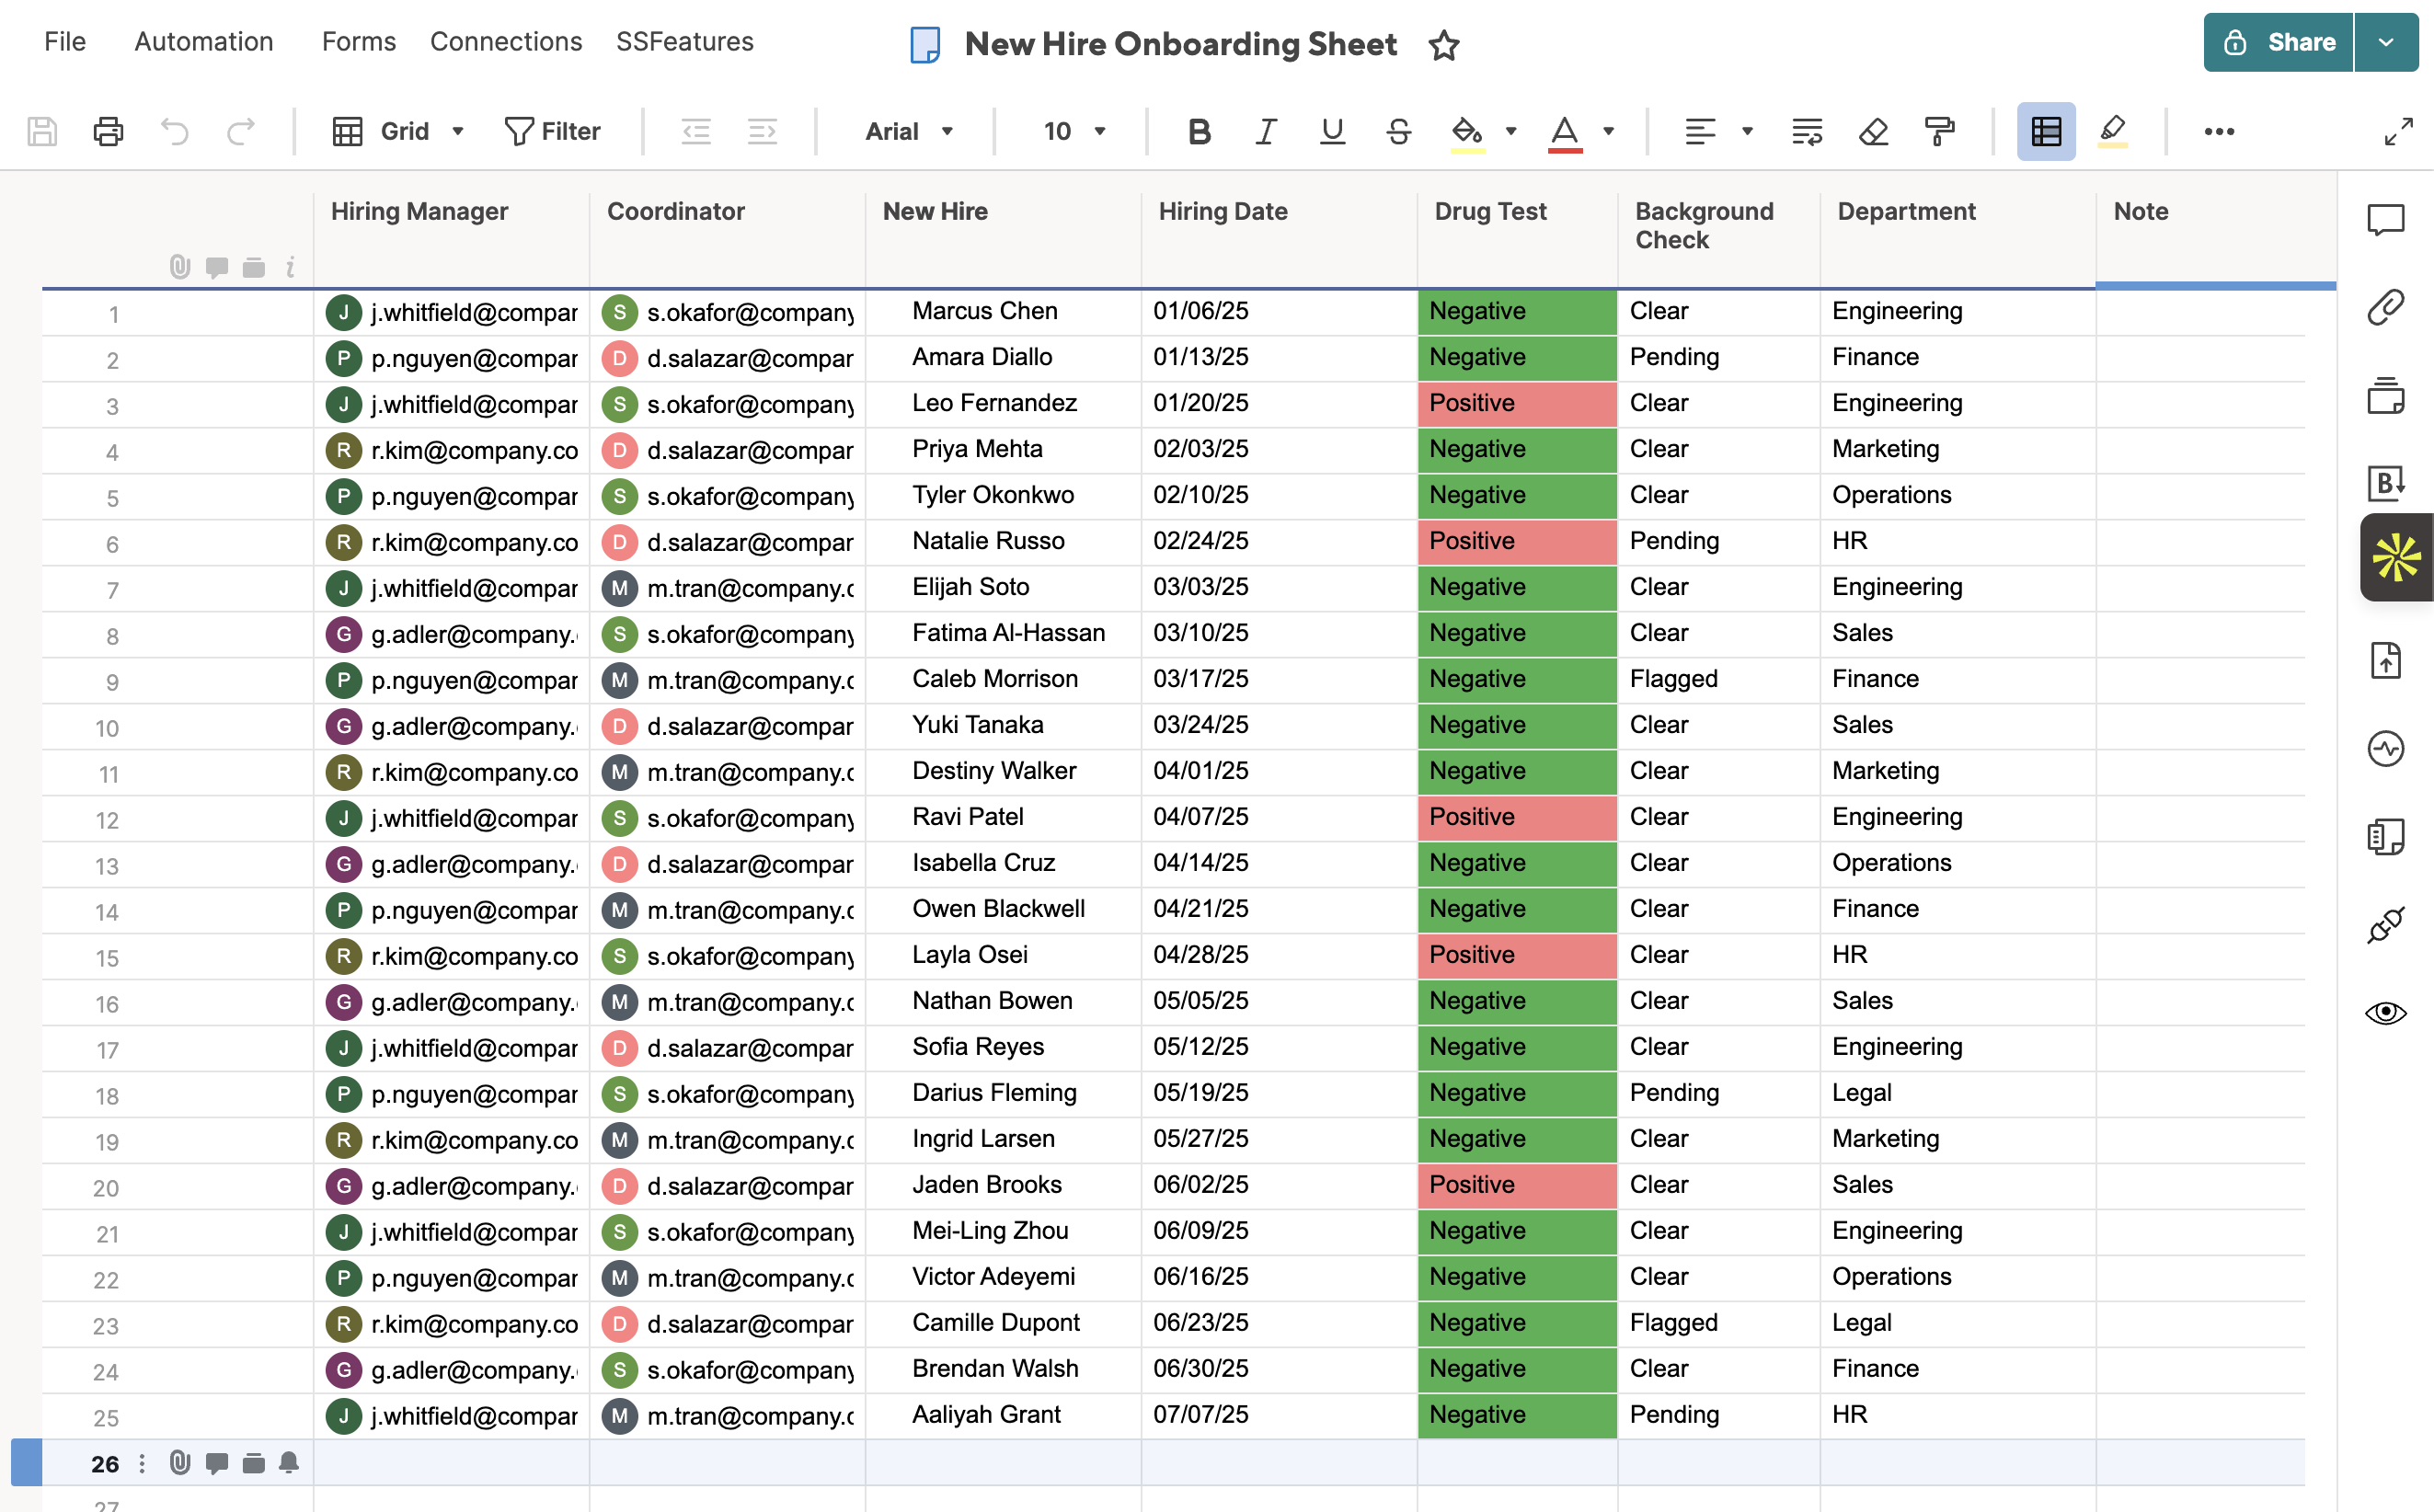
Step 1: Build the master onboarding sheet
Create a new Smartsheet with columns for every onboarding task and data point: Employee Name, Start Date, Department, Assigned Owner, Task, Status, Due Date, Completion Date, and Notes. Keep internal-only fields (like payroll flags or system access notes) here — they'll never surface to outside viewers. This sheet is the source of truth. Nothing gets tracked anywhere else.
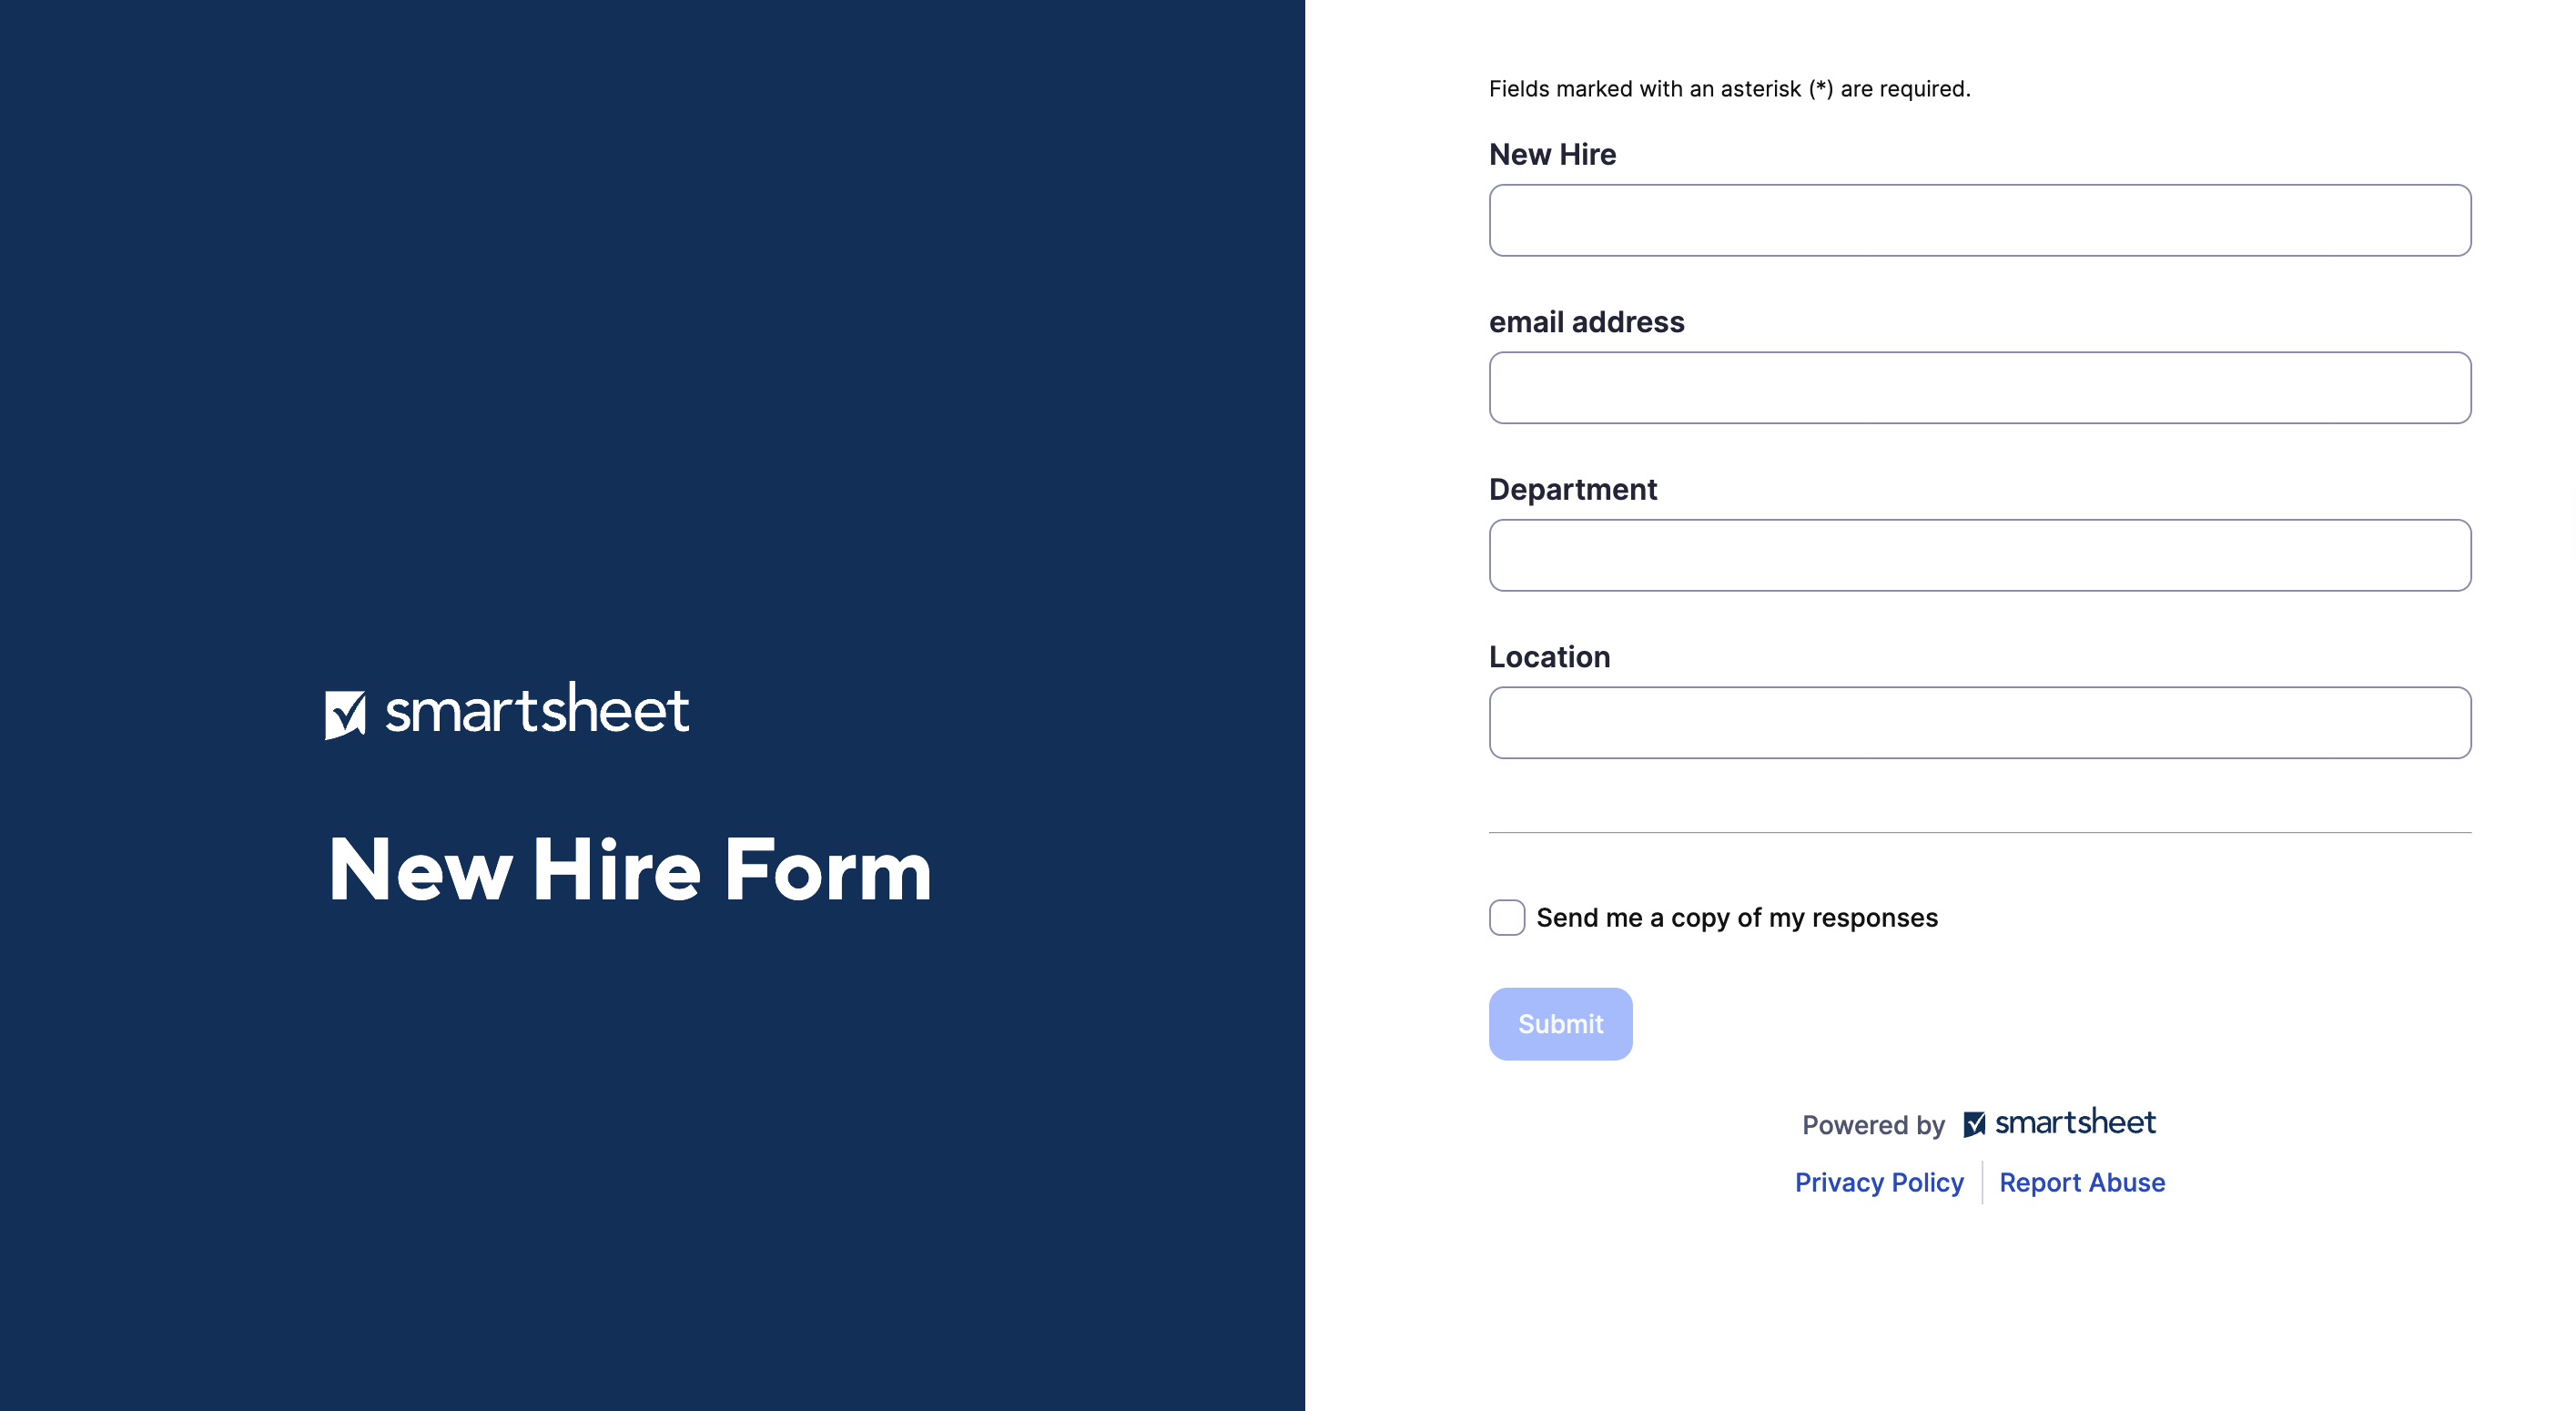
Step 2: Create the intake Form
In your master sheet, go to Forms → Create Form. Include only the fields the submitter needs: new hire name, start date, department, and hiring manager. Leave any internal tracking columns off the form entirely. Set required fields and add any dropdowns you need (e.g., a Department dropdown reduces typos and keeps data clean). Copy the shareable form link — this is the only thing HR or managers need to kick off a new onboarding.
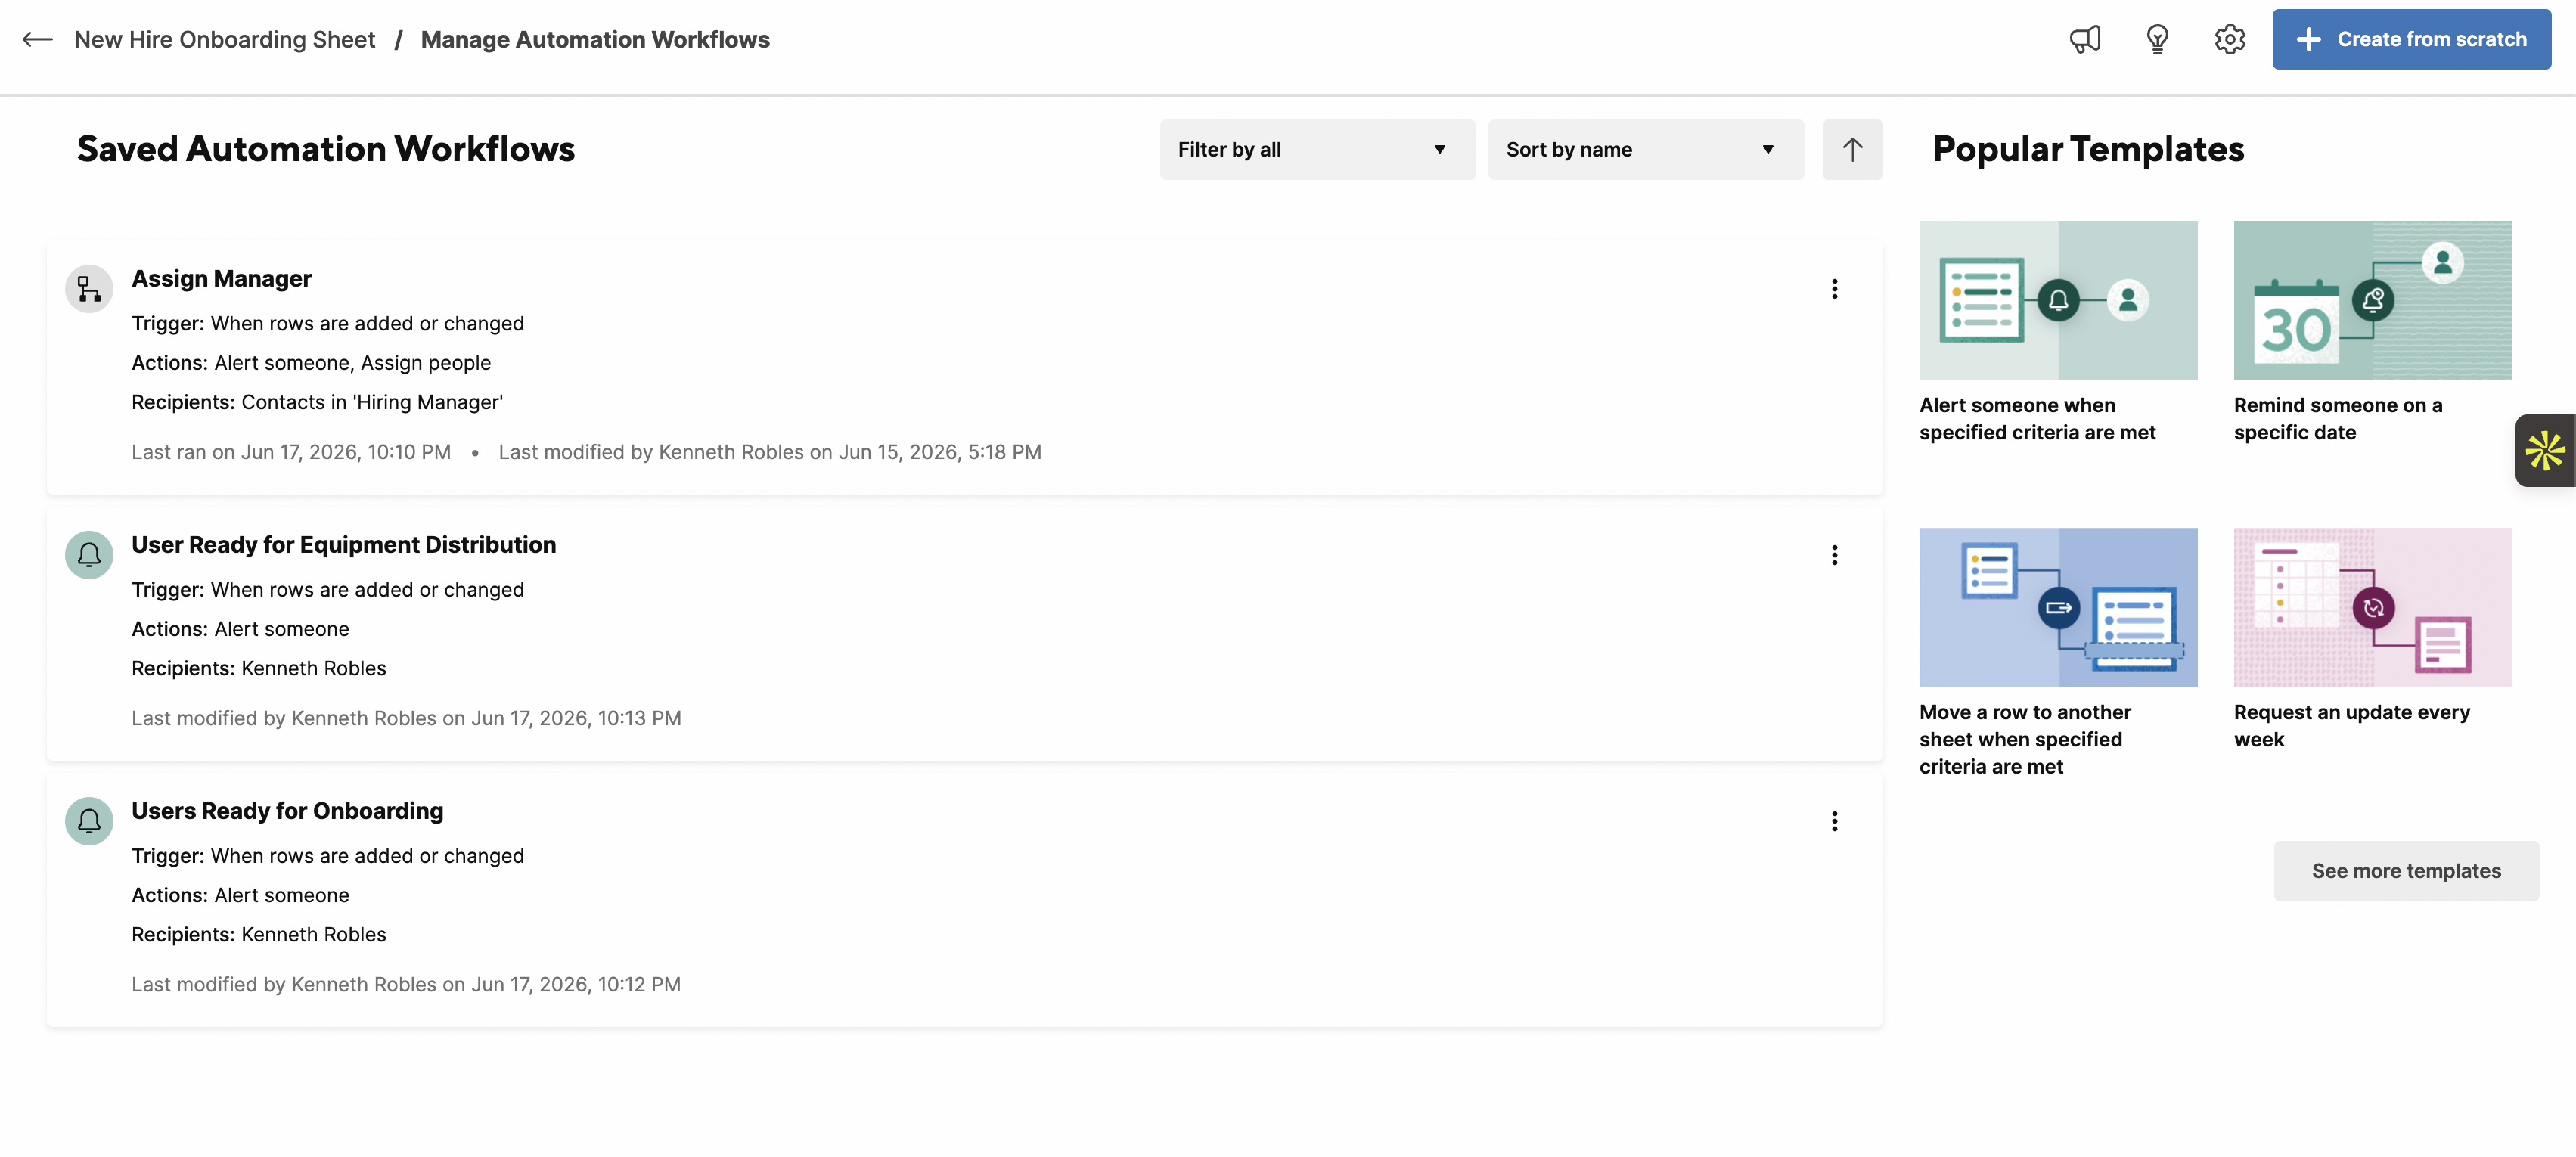
Step 3: Set up automation rules
Open Automations → Create Workflow. Build three core rules to start:
- New row trigger: When a row is added via the Form — assign the onboarding owner and send them a notification with the new hire's name and start date.
- Status change trigger: When the Status column changes to "In Progress" — notify the assigned owner.
- Due date reminder: When Due Date is within 2 days and Status is not "Complete" — send a reminder to the owner.
Smartsheet's automation uses a point-and-click workflow builder — no code required. For a full reference on trigger types and conditions, see Smartsheet's official automation documentation.
Tip: Start with these three rules and add more as you identify gaps. Over-engineering automation on day one creates maintenance overhead — keep it simple and iterate.
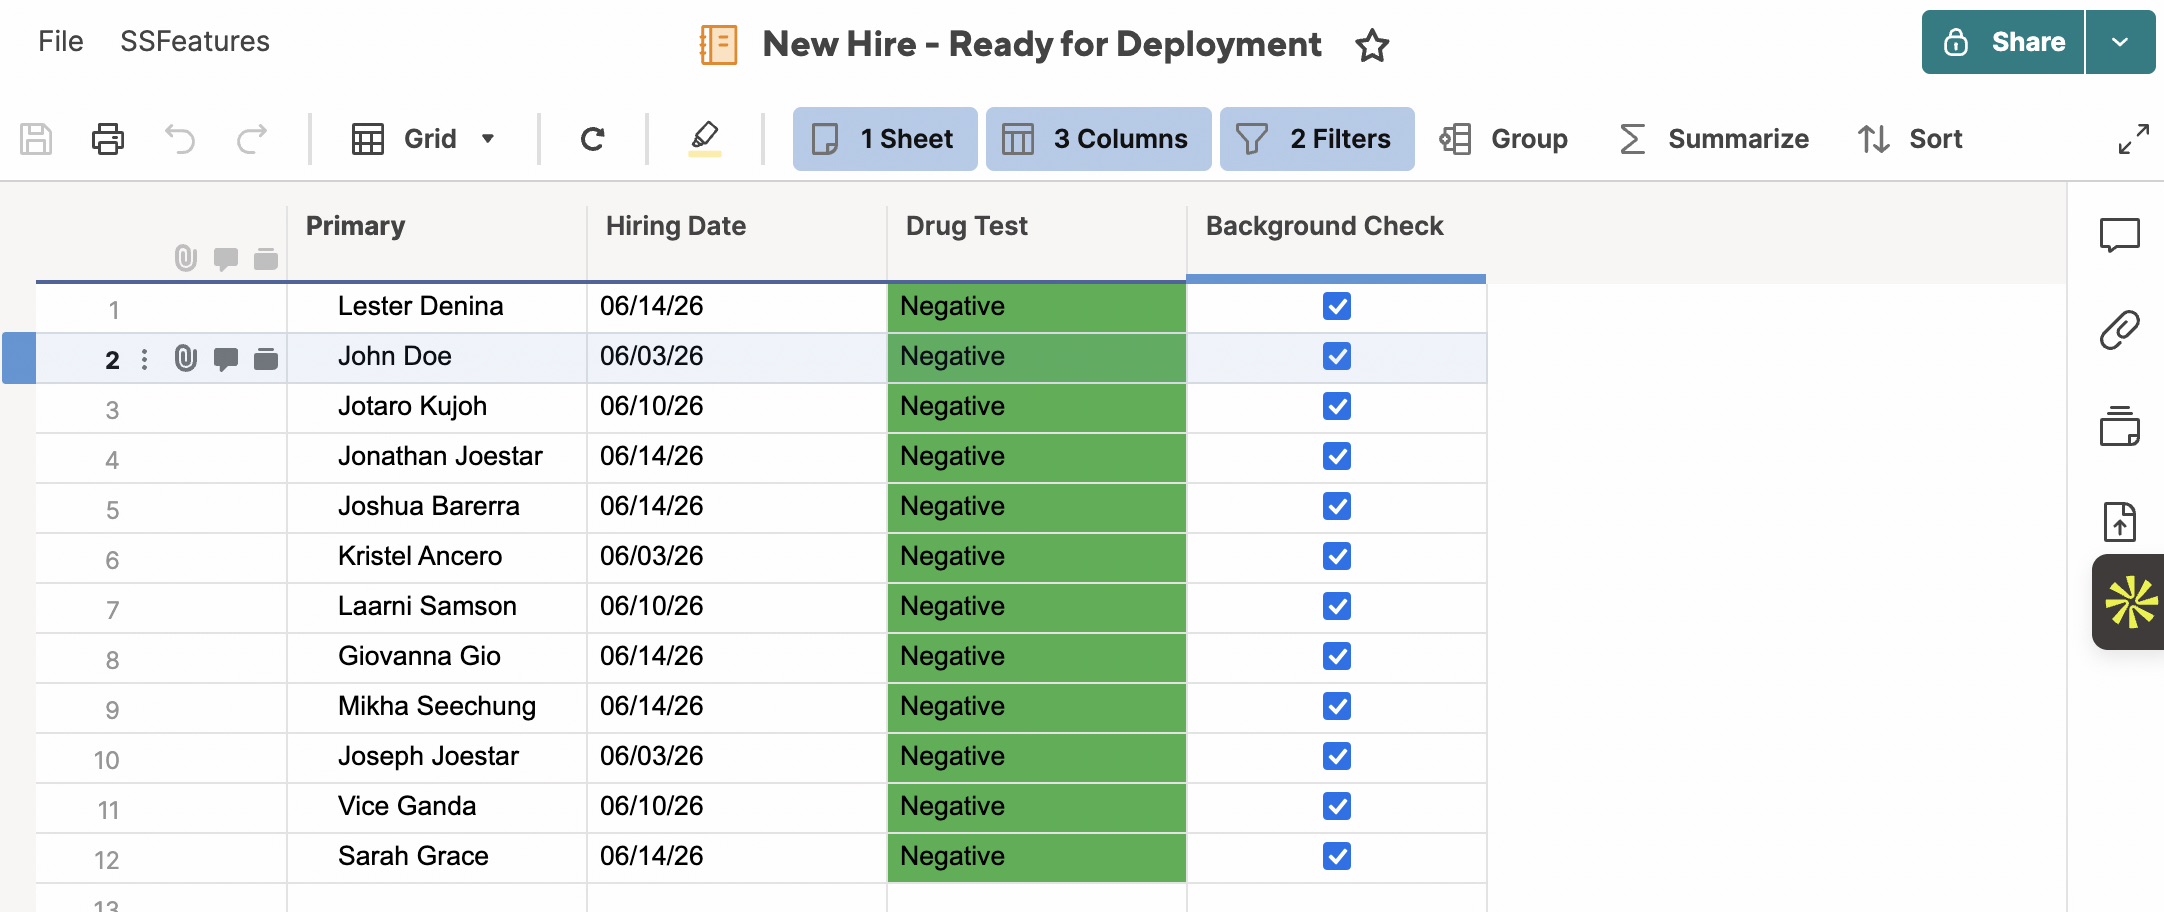
Step 4: Build the Report for the HR or operations team
Go to Solution Center → Create → Report → Row Report. Select your master onboarding sheet as the source. Filter to show only rows where Status is not "Complete." Add columns: Employee Name, Task, Assigned Owner, Due Date, Status. Share this Report with your HR or operations team. They get a live, filtered task list — without access to the full sheet or anyone else's data outside this view.
Step 5: Build the Dashboard for leadership visibility
Create a new Dashboard from the Home menu. Add three widgets:
- A Chart widget — onboarding tasks by Status (a donut or bar chart works well here).
- A Metric widget — total active onboardees pulled from a sheet summary formula.
- A Report widget — embed the overdue items Report so leadership can see at-risk items without drilling into individual sheets.
Share the Dashboard link with leadership. It refreshes automatically every time the underlying sheet changes. No one needs to compile or send a status update.
Step 6: Test the full workflow end to end
Submit a test entry through the Form using a dummy employee name. Confirm: the row appears in the master sheet, the automation fires and the correct owner receives a notification, the Report reflects the new row, and the Dashboard updates. Then open an incognito window and log in as a test team member — verify they see exactly what you intended and nothing more. This step catches permission mistakes before a real employee's data is involved.
How we built this for an operations team
One of our clients — an operations team — was managing all employee onboarding entirely in Excel. The sheet was slow to update, hard to track across departments, and completely invisible to leadership unless someone manually pulled a status report. There was no notification system, so task handoffs depended on people remembering to check the file.
We built the four-part setup above: a Form to capture new hire intake and eliminate direct sheet access, automation rules to assign tasks and fire notifications the moment a row was submitted or a status changed, a Report filtered to open and overdue items for the operations team, and a live Dashboard for leadership showing onboarding status across all active employees in real time.
The result: onboarding fully automated, real-time visibility enabled for leadership without any manual reporting, and manual effort reduced dramatically — the team went from chasing updates across a shared spreadsheet to having a system that pushed the right information to the right person at the right time.
When this approach won't work
- Smartsheet Pro plan. Pro includes basic automations but caps the number of automation rules and lacks some advanced trigger options. A Business or Enterprise plan is required to fully implement what's described here.
- Complex conditional branching. If your onboarding has very different task paths depending on role, location, or employment type, a single-sheet setup can become unwieldy. At that point, Smartsheet WorkApps or a multi-sheet setup with cross-sheet formulas is the better architecture.
- HRIS-triggered automation. If you want Smartsheet to automatically receive a new hire record the moment it's created in Workday, BambooHR, or another HRIS, you'll need an API integration or middleware like Zapier. The Smartsheet structure described here stays the same — but the intake step changes from a manual Form submission to an automated row insertion.
Common mistakes to avoid
- Putting too many fields on the intake Form. The Form should only capture what's needed to create the row and trigger the workflow. Internal tracking fields, formula columns, and system-generated values should never appear on the Form.
- Not assigning owners at the row level. Automation notifications only work well when every task row has a named owner in a Contact column. If the Owner column is a plain text field instead of a Contact column, Smartsheet can't route notifications correctly.
- Sharing the sheet instead of the Report or Dashboard. The entire value of this setup is that HR and leadership never need to touch the master sheet. If you share the sheet directly, you've bypassed the access controls and reintroduced all the original problems.
- Skipping the end-to-end test. Always test as a recipient before going live. Submit a Form entry, follow the notification, and confirm the Report and Dashboard reflect the correct data — all in one pass, before real employee data enters the system.
Related: If you also need external contractors to submit data into your Smartsheet setup without sheet access, read our guide on how to let vendors and subcontractors submit data without giving them sheet access.
Frequently asked questions
Can I automate employee onboarding in Smartsheet without IT help?
Yes. The Forms, Automations, Reports, and Dashboards used in this setup require no code and no IT involvement. You build everything through Smartsheet's visual interface. The most technical step is configuring automation triggers and conditions, which uses a point-and-click workflow builder — no scripting required. A Business or Enterprise plan is required for full automation.
What is the difference between a Smartsheet Report and a Dashboard?
A Report is a filtered, live view of rows from one or more sheets — it shows task-level data and is best for team members who need to act on specific items. A Dashboard is a higher-level summary view built from widgets — it's designed for leadership or stakeholders who need status at a glance without interacting with individual rows. Both update automatically and can be shared without sharing the source sheet.
How is this different from just sharing the onboarding spreadsheet?
Sharing the underlying sheet gives every recipient full visibility into every row and column — including other employees' data, internal HR notes, and fields they shouldn't edit. The Forms + Reports + Dashboard setup gives each person only the slice of data relevant to their role, with no risk of accidental edits. It also adds automated notifications that push tasks to owners instead of requiring everyone to manually check for updates.
Does this work for contractor onboarding, not just employees?
Yes, and it's often a better fit for contractor onboarding precisely because contractors shouldn't see internal employee records. The same architecture applies: a Form for intake, automation to assign tasks and send notifications, and a Report or Dynamic View filtered so each contractor sees only their own checklist. We covered the Dynamic View approach in our previous post on vendor data submission.
Can I connect this Smartsheet onboarding setup to an HRIS like Workday or BambooHR?
Yes. Smartsheet integrates with HRIS platforms through its native integrations, Zapier, or direct API. The most common setup routes a trigger from the HRIS to automatically insert a row into your onboarding master sheet — eliminating the manual Form submission entirely. If you need this connected to an existing HRIS, get in touch and we can scope it.